Duty Roster
Work schedule is a tedious work in which we need to plan the time of their vacation and holidays not to have a staff shortage. Schedule will dictate the time and days the employee is expected to work. Sanoplan is a great help to make the work easy and monitored.
Here are the easy steps:
#1) Without login you can
a. jump forward or back one week at a time by clicking on the week arrow at the top left
b. click on the table button at the top right to view the 4 week plan – in the normal layout or by clicking again on the assignment/absence per employee
c. Double-click on a name in the employee column to open a color selection window in which you can assign a color to an employee so that you can easily recognize the name in the week
d. click on Print to print the schedule (you must set the landscape format manually)
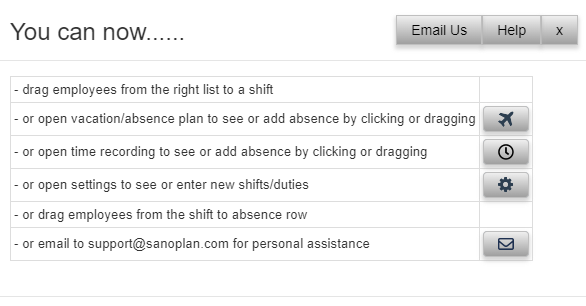
e. By clicking on the Airplane“symbol in the top right-hand corner, you can view the vacation and absence plan
– You can scroll through the months
– by swiping on a trackpad
– by scrolling with a mouse wheel
– by dragging the navigation bar horizontally
#2) After logging in as a user, you can also
a. see which changes have been made that affect you
b. Request vacation for yourself by double-clicking on the desired vacation day in the vacation list and then dragging as far as the vacation should extend.
c. You can also log in on your cell phone and view your shifts. To do this, select the URL https://www.sanoplan.de/sanoplan/mobilelogin.html in your browser. Enter the name of your database and your personal password.
#3) After logging in as an administrator, you can also
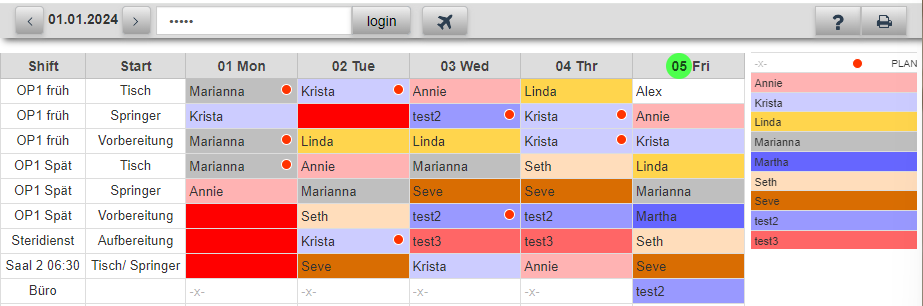
a. Move names with the mouse by clicking on them and moving them to another shift within the same day. If possible, the system will immediately assign a substitute
b. Select names from a self-learning list of suitable and available employees. The list is displayed when you hold the mouse over a shift.
c. You can also click on a name in the employee column and move it to a shift to solve special problems
d. You can drag the name of a sick employee down into the absence area highlighted in blue. The substitute’s name is then automatically inserted in this shift if substitutes have been defined. If the substitute is also absent, the name of the second substitute is inserted. If the second substitute is also absent, the field is left empty and marked red as a warning.
e) If someone is assigned to more than one shift or is scheduled and absent at the same time, the name is marked with a red circle. Either you correct this (e.g. in case of illness) or you accept that the employee is assigned to several shifts by leaving the marking as it is.

#4) After logging in as a supervisor, you can also edit vacations and absences
a. Request vacation (red after 2 clicks on a day)
b. Approve leave (green after clicking on red requested leave, or triple-click on white), you can also extend or shorten leave by dragging.
c. Delete vacation or sick leave (double-click on yellow)
d. Grant overtime off: click once on the white marked day in the vacation plan, then the field turns turquoise
e. Enter further training: click once again on the day marked in turquoise (no double-click), then the color switches to training (=brown)
f. the next single click switches the color back to white (no absence)
g. In the airplane button, a red dot indicates when employees have applied for leave but have not yet been approved, so you need to take action.
h. Additionally you can do the whole setup (see below)
#5) After logging in as an owner, you can also
Create new databases. Click on the gear icon at the top right. Then click on the user list and you will find a database symbol at the top left. You can use this button to create new databases.
#6) Setup
a. login as supervisor or owner
b. click on the gear icon settings icon in the top right corner
c. you can select the language at the top left
d. Enter user name
i. delete all names that you do not need by clicking on the red [-] button (the mobile site can then no longer be accessed)
ii. Add new names by clicking on the green [+] button
iii. enter name and password and select whether employee or administrator (administrators are not displayed in the planning list, administrators can change appointments and vacation planning)
iv. Make sure that you have entered AT LEAST one owner or supervisor, as this is the only way to change the settings and appointments
v. Name and password are also required if the employee wants to view the shift schedule on their cell phone.
e. Rooms and functions
i. delete all rooms/functions that you do not need by clicking on the red [-] button
ii. add new rooms/functions by clicking on the green [+] button
iii. Enter the room and function, then select the 1st and 2nd substitute (you can also use substitutes later if necessary)
iv. You can change the order of the rooms/functions by clicking and holding the mouse on the corresponding room and then dragging the room down or up to the order you want to see in the normal planning.
v. then click on whether you want your shift plan to be the same every week or whether you need a 2, 3 or 4 week cycle (the orange number indicates after how many weeks the plan repeats)
vi. If you leave the settings by clicking on the [x] button, you will return to the normal (now changed) planning view (administrators are not displayed)
f. Then click on the edit button to the left of the [x] button, you will then be taken to the basic planning, which you must define for weekly or 2,3 or 4-weekly planning
i. You can click on the names of the employee column with the mouse and move them to the different shifts.
ii. You can click on the name of the employee column with the mouse and drag it to the substitute columns. The substitute assigned there will be automatically assigned if the employee assigned is absent.
iii. If you want to make settings for the following week, click on the week you want to edit at the top.
iv. To save the new settings, click on the floppy disk symbol at the top right. If you want to keep the original status, click on Exit.